I love Mary Corbet's Needle 'n Thread articles. Some do not interest me but I really enjoy reading them. This article was in my saved e-mail box and I want to put it in my blog for safe keeping. I adore chicken scratch embroidery. I have an old apron my beloved Grandmother Mildred Roberts made with a chicken scratch design. It hangs from Baker's Rack in proud tribute to my beautiful Grandmother.
| Visit
Needle 'n Thread! |
|
|
|

2017-06-26 07:30:00-04
|
|
|
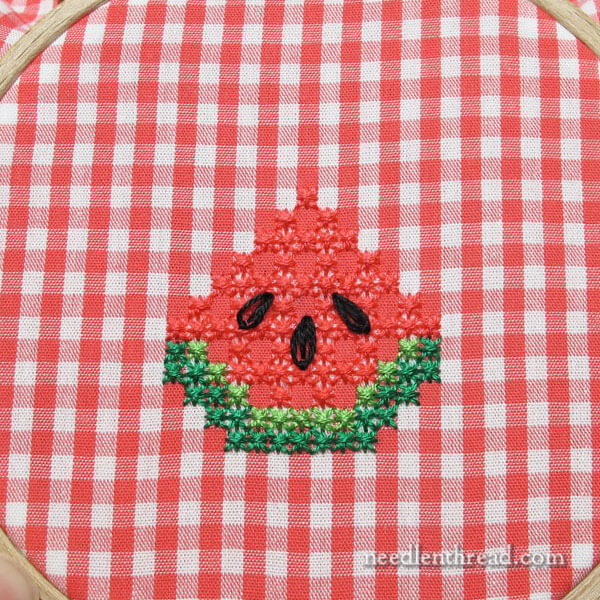
A few years ago, I wrote a tutorial for Commonthread by DMC, for working this watermelon design in gingham embroidery.
Since then, the article has been archived so it’s hard to find over there. To help out those who are looking for the pattern and instructions and who have requested it recently for this summer, I’m condensing the instructions and offering the pattern below.

To get started with this project, you’ll need to know how to work the foundation stitches for gingham embroidery (demonstrated week before last in
this tutorial) and how to work the leafy clusters, also demonstrated in the same tutorial.
Materials
For the gingham watermelon, you’ll need the following materials:
1/8″ cotton gingham checked fabric
DMC floss in white, dark green, light green, black, and red or pink or coral, depending on what color you want to make your watermelon! In this sample, I used the these color numbers of DMC: 310 (black), B5200 (bright white), 910 (dark green), 703 (bright green),
and 892 (bright reddish-pink).
Hoop
#7, 8 or 9 crewel (embroidery) needle
#24 or 26 tapestry needle
Scissors
Free Watermelon Pattern
Here’s the watermelon pattern for you. It’s a PDF, so you can download it to your computer and print it for your personal use. It’s a chart, and the background layout looks like gingham, so you can see which colored squares on the gingham get embroidered:
Watermelons in Gingham Embroidery (PDF)
Stitching Order
With this pattern, I embroidered the edge of a gingham table runner. You can use the design to embroider placemats, a table cloth, a child’s dress – whatever you want to stitch – but just make sure that the placement of your stitches corresponds to the correct
squares on the gingham, to get the lacy look.
I started about five inches in from the edge of my fabric, with the center watermelon on the chart. Using a water soluble pen, I placed a mark on the gingham square closest to center, to mark where to start the first (center) watermelon.
Following the chart, and using two strands of floss in a crewel needle, stitch the watermelon, using double cross stitch (you’ll find the
tutorial for chicken scratch foundation stitches in this article).
Add three daisy stitches in black (video tutorial here) for the seeds, following the chart
for placement. In the middle of each daisy stitch, work one long straight stitch in black.
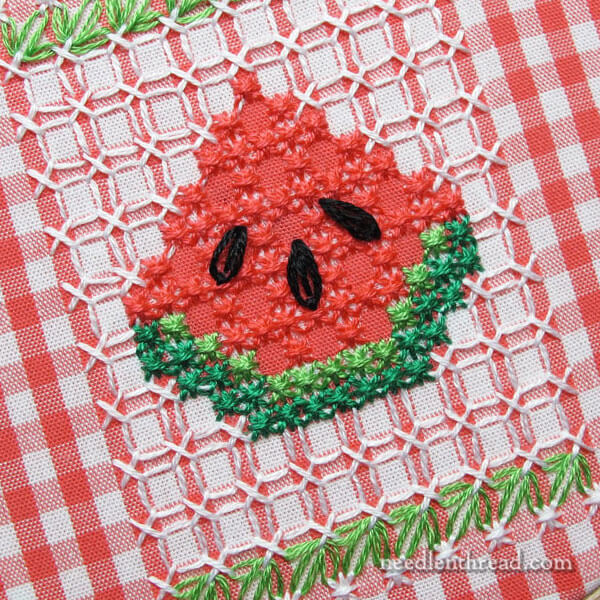
Follow the chart for the placement of the white foundation cross stitches and double cross stitches around the watermelons.
You’ll find a
tutorial for working the square white lacing stitches in the background here.
This tutorial for leafy clusters will show you how to embroider the leaf edging around the
design.
You can work as many repeat watermelons as you need to edge your fabric. The repeats are marked on the pattern. Leave space at the edges to work the triangular ends of the design.
Hope you enjoy it!
This design and tutorial was originally written by me for
Commonthread by DMC and published there. I’m reprinting it here, with the pattern and basic instructions, because the original article is not listed on Commonthread and doesn’t come up in their search results. Since folks are asking where to find it, I’ve
made it available here for easy access.
|
|
|
|
|
No comments:
Post a Comment